A reliable leash is one of the most important parts of your dog’s everyday life.
Leashes act as important safety and training tools, and they allow your pet to get the regular exercise and outdoor time he needs. Moreover, it’s often helpful to have multiple leashes on hand, so you’ll be prepared for different scenarios and occasions.
For example, you may want a really long lead to use while hiking in a large open area, but a standard 6-foot leash will work best for daily walks.
There are a ton of great leashes on the market, but many owners prefer to simply make their own DIY leash at home.
We’ll try to help you do this below, as we share some of our favorite DIY dog leash plans. This way, you can construct a leash that’ll be perfectly suited for your pooch and his needs.
9 Best DIY Dog Leashes
Check out some of our favorite DIY leash plans below! Just remember to select one that makes sense for your specific pooch!
1. DIY Cotton Rope Leash
If you’re looking for a cute and functional leash for everyday use, this cotton rope leash by Pets Plus Us is an excellent option. All materials for this leash can be obtained at a local hardware store, though you’ll want to set aside some extra time to do the braiding properly.
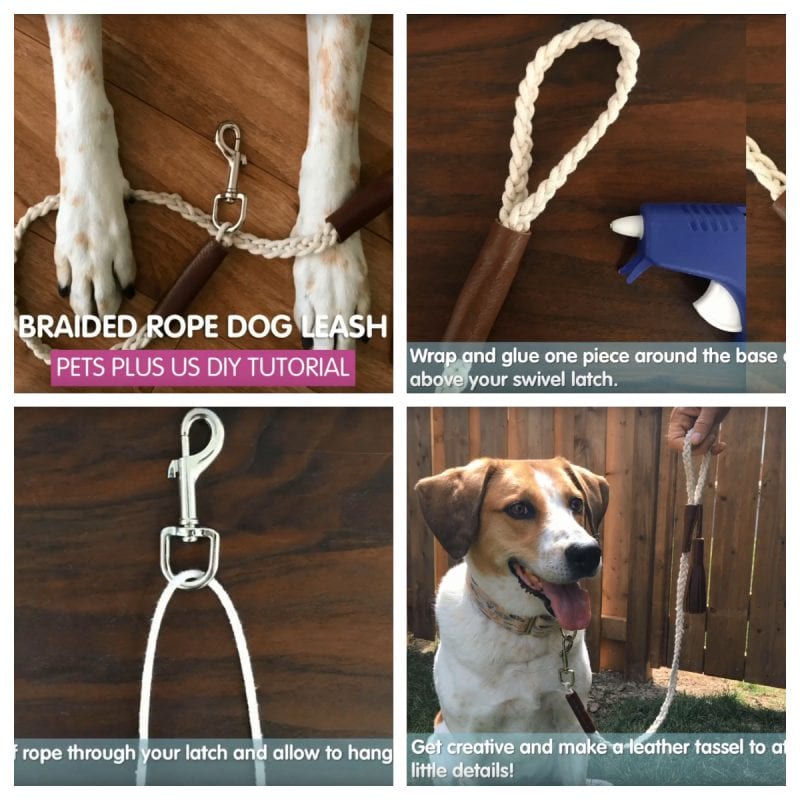
Essentially, you’ll need to tightly braid the cotton rope, and attach it to a metal latch, which clips to your dog’s collar. Leather is then wrapped around each end of the leash to prevent fraying and provide a more comfortable grip.
Difficulty Level: Moderate
Materials Needed:
- 1 roll of cotton rope (select a thickness that’s appropriate for your pet)
- 1 swivel bolt snap latch
- Leather scraps
Tools Needed:
- Scissors
- Hot glue gun
- Measuring tape
2. DIY Scrap Fabric Leash
This adorable leash by blogger Sew Can She is a great way to make use of extra fabric scraps you may have laying around the house.
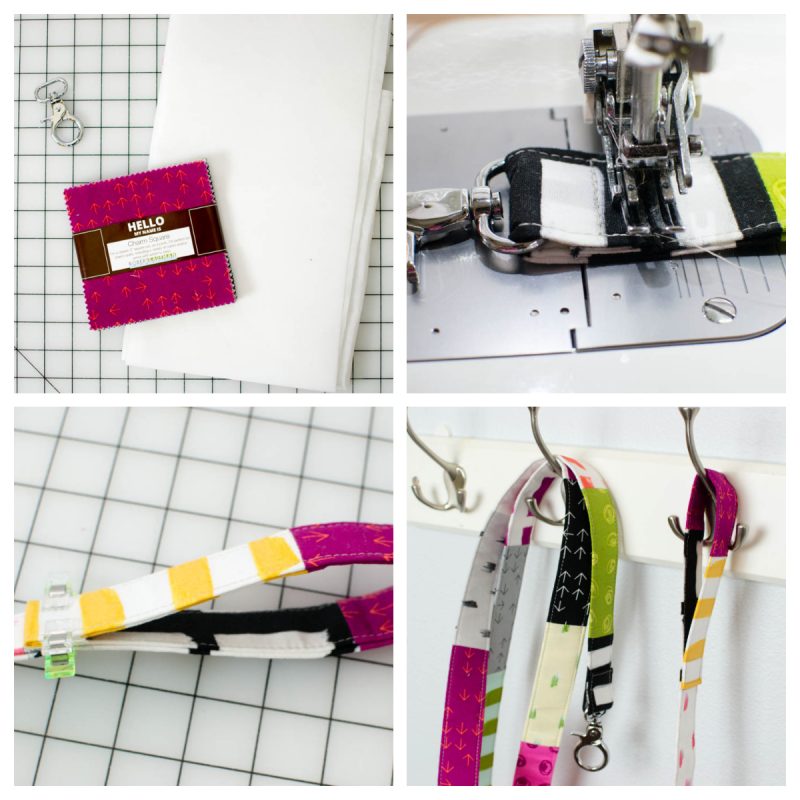
You’ll need some basic sewing skills (and a sewing machine) for this one, but other than that, this DIY leash is pretty simple to make. Extra fabric is sewn around interfacing and attached to a clasp to produce a soft, flexible leash.
Difficulty Level: Moderate
Materials Needed:
- 1 metal lobster claw clasp
- Assorted charm squares or fabric scraps
- 1/2-yard of fusible interfacing
- 1 heavy-duty needle for sewing machine
Tools Needed:
- Scissors
- Heavy-duty sewing machine
Check out the designer in action below!
3. Braided Rope Dog Leash
The Braided Rope Dog Leash by blogger Lia Griffith is pretty similar to the previous leash, but it has a bit more (optional) flair, which increases the fancy-factor substantially.
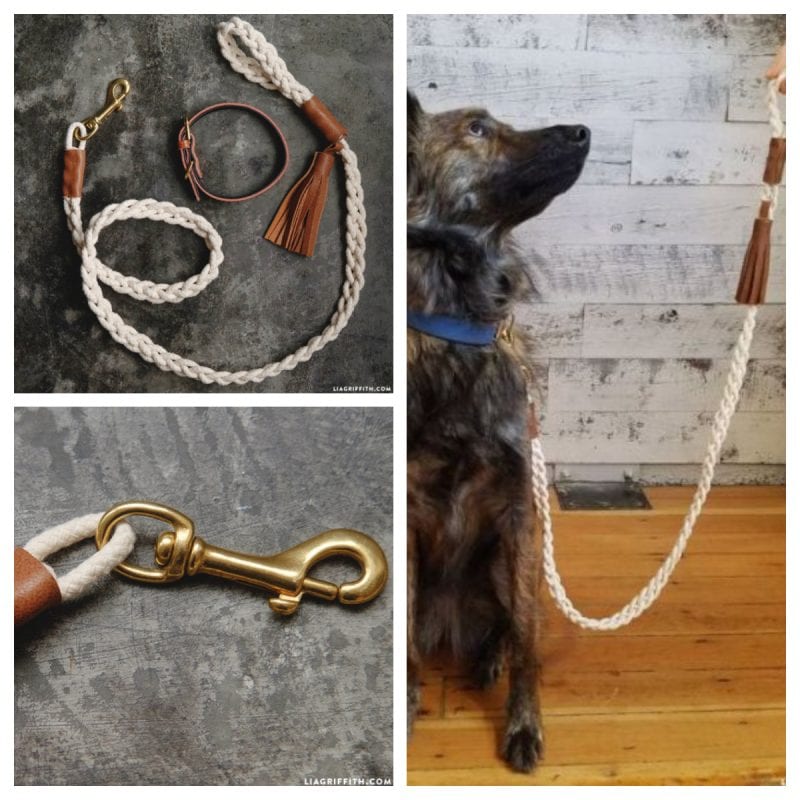
In this tutorial, you’ll braid cotton clothesline to create a leash and simultaneously attach it to a brass hook. The process itself is fairly simple, but it may take a little time to get the braiding pattern down pat.
Note that this leash is a bit thin (based on the dimensions provided), so be sure to test the strength carefully before putting it to use.
Difficulty Level: Moderate
Materials Needed:
- 7/32-inch cotton clothesline
- Leather scraps
- Brass swivel eye hook
Tools Needed:
- Scissors
- Hot glue gun
- Ruler
3. DIY Paracord Dog Leash
Paracord is a very strong material, making it a good option for DIY leashes. The Paracord Guild provides an excellent set of plans that’ll help you construct your very own DIY paracord Dog Leash.

This tutorial has an added optional overlay, which will help reinforce the braiding. Essentially, the paracord is braided to a snap hook and then wrapped a second time with a complementing color of paracord.
Difficulty Level: Moderate
Materials Needed:
- 2 rolls of paracord in complementing colors
- 1 snap hook
- 1 lacing needle
Tools Needed:
- Scissors
- Lighter
4. Thick 8 Strand Paracord Dog Leash
If you don’t think the previous paracord dog leash is sturdy enough for your pet, Youtuber Paracording Around provides an even stronger version, based on an 8-strand design.
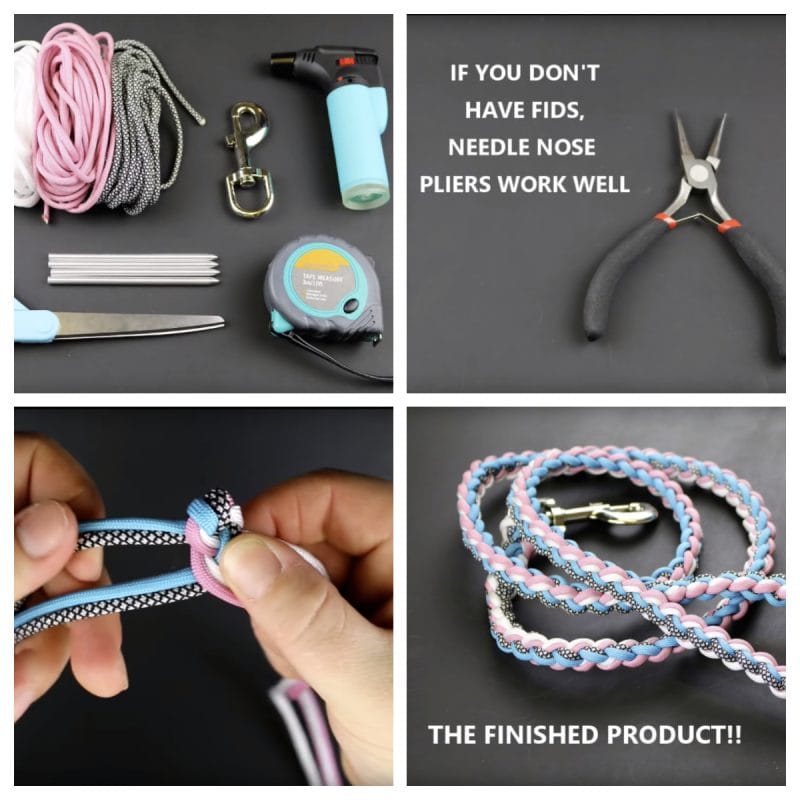
Creating this rope leash may be a bit time consuming, but the end results look like they’re well worth the effort!
Difficulty Level: Moderate to Difficult
Materials Needed:
- 4 rolls of paracord in different colors
- 1 claw hook clasp
- 1 lacing needle
Tools Needed:
- Hot glue gun
- Scissors
- Measuring Tape
5. DIY Wedding Dog Leash
If Fido is joining you down the aisle on your special day, these DIY leash plans by blogger Something Turquoise are essential.

These leashes are made by combining braided rope with fake flower accents to provide the extra flair you’d expect for a wedding. The rope is attached to a handsome clasp and then reinforced with wire and cord.
Though this leash is pretty, it may not be the best for everyday use or more active pups: The flowers are secured with hot glue but won’t stand up to constant movement.
Once you’ve made this festive leash, be sure to pair it with one of the best dog wedding collars available.
Difficulty Level: Moderate
Materials Needed:
- Braided cotton rope
- Faux flowers
- Lobster claw clasp
- Faux suede cord
- 20-gauge wire
Tools Needed:
- Wire cutters
- Hot glue gun
- Scissors
6. DIY Fabric Dog Leash
What I Made is a craft-oriented blog that makes it easy to learn how to construct a leash out of fabric. You can purchase your own nylon webbing to start from scratch, or dress up a nylon leash you already have.
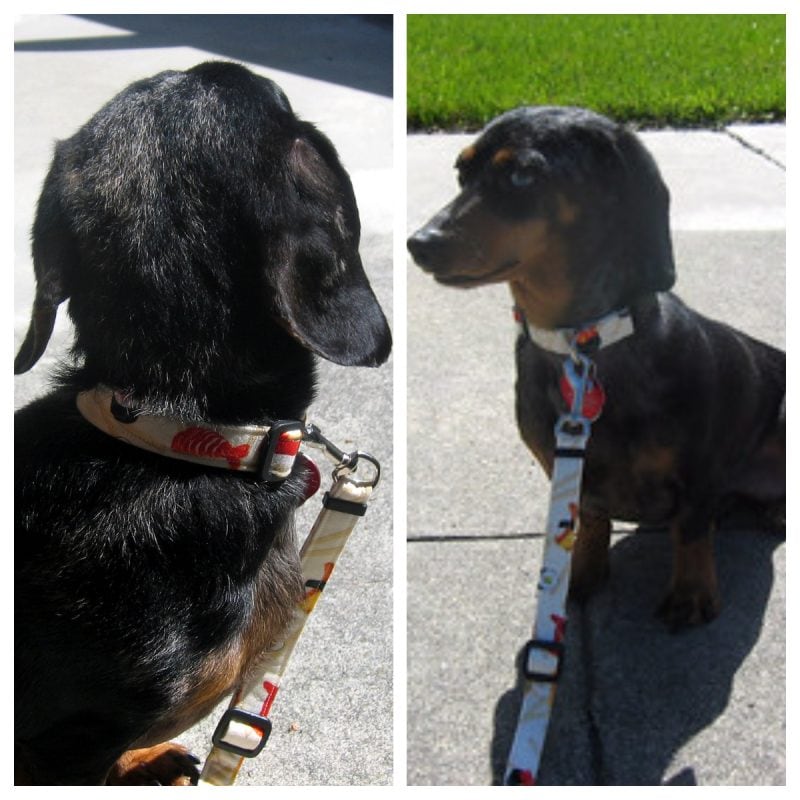
This leash DIY is fairly simple and consists of sewing sheets of fabric around a nylon strip attached to a clasp making a standard decorative leash. You’ll need to be familiar with sewing for this tutorial, but the entire process shouldn’t take more than an hour.
Difficulty Level: Moderate
Materials Needed:
- Nylon fusible webbing or pre-existing nylon leash
- Metal snap hook
- Split ring
- Cotton fabric
- Thread
Tools Needed:
- Rotary cutter
- Ruler
- Cutting mat
- Ironing board and iron
- Sewing machine
- Scissors
Unfortunately, there aren’t a lot of photos included with these plans. But, you can watch the video below to see a similar project in action.
7. DIY Climbing Rope Dog Leash
If you’re into rock climbing, you’ll love this DIY climbing rope leash by The Honest Kitchen.

The leash is made by securing a carabiner to one end of the climbing rope with a knot and creating a handle on the other end, which is also secured by a knot.
The carabiner serves as a collar clasp, and you can customize this rope leash by opting for different colors of rope.
Difficulty Level: Easy
Materials Needed:
- Carabiner
- Climbing rope
Tools Needed:
- Scissors
- Lighter
8. DIY Dip Dyed Rope Dog Leash
This Dip Dyed Rope Dog Leash DIY by blogger Capree Kimbal is a groovy take on a simple rope leash.

Essentially, the rope is cut and dyed in sections to achieve an ombre (blended) appearance. Once the rope has achieved the desired design, you’ll need to dry it out and attach it to a hook. Rope clamps are then added to create a convenient handle.
Difficulty Level: Easy
Materials Needed:
- Thick cotton rope
- Fabric dye
- 2 rope clamps
- 1 snap hook
- Leather scraps (optional)
Tools Needed:
- Rubber mallet
- Large cooking pot
- Scissors
9. Easy DIY Dog Leash
This simple rope leash by Youtuber Animal Wise is very easy to make and can be personalized to match your pooch’s unique sense of style.

The leash is created by braiding a strand of ribbon with rope and then attaching the completed braid to a clasp to secure to your pup’s collar. You can adjust the width of the rope according to your dog’s size.
Difficulty Level: Easy
Materials Needed:
- Cotton rope
- Thread or ribbon of choice
- Metal clasp
- Fabric scraps
Tools Needed:
- Hot glue gun
- Scissors
Important Considerations for DIY Leashes
It’s important to evaluate each DIY plan based on your pup’s specific needs. What may be appropriate for a Great Dane may not be the best choice for a dachshund.
Here are a couple of factors to take into consideration when crafting your DIY leash:
Thickness
It is very important to consider the thickness of the leash you intend to construct. Leashes that aren’t thick enough may fail when used with large or strong puppers.
In general, larger breeds will require a thicker leash than smaller breeds do. It is a good idea to use the measurements of leashes made by brands you trust if the leash thickness is not specified in the DIY plan.
Length
Standard dog leashes are usually about 6 feet long, but there are occasions where you may want a shorter or longer leash.
For example, you may opt for a shorter leash during training for more control, or you may want to use a longer leash when trying to let your dog enjoy a bit more freedom, practicing come when called, or other traditionally off-leash activities with the safety of a long line.
Just make sure you are select a suitable length for the scenario in which you intend to use the leash.
Chew-Proof Materials
Some pups have a tendency to nibble on their leash — or anything else they can get their mouth on! This can quickly turn your DIY leash into a DIY mess!
So, if your pooch is a chewer, try to make a DIY leash from rope or some other sturdy material. Determined doggos may still be able to chew through rope, but it’ll last longer than many other materials.
For that matter, you may want to just look at some of our favorite chew-proof leashes and heavy-duty leads on the market.
Comfortable Handle
The leashes discussed above all feature a handle that you can hold while walking your pooch. But, once you start making the project, be sure to consider the comfort the handle provides.
It is usually not difficult to add a bit of padding or some extra fabric to the handle, to ensure that it won’t hurt your hand. This is especially important for those with large or strong pups. If you have arthritis, also make sure to check out our guide on the best dog leashes for arthritis for gear that will be easier on hurting hands.
Clasp
The clasp is one of the most important safety features of a leash so it’s important you pick out something secure.
Look for clasps made out of real metal, and be sure to select a style that you’ll find easy to operate. It’s also a good idea to go with some type of locking clasp (such as a locking carabiner), if you’re worried about your dog disconnecting the clasp.
Safety First: Always Test DIY Leashes Carefully
Be sure to execute these designs with care. These plans are designed to be as sturdy as their purchased counterparts, but improper craftsmanship can lead to a serious safety risk for you and your pooch.
Additionally, before using any of these leashes in squirrel country or near a busy road, test out the finished product in your living room or an enclosed outdoor area.
Not only will this give Fido a chance to get accustomed to the new leash, but it will also act as a vital safety run and give you the opportunity to improve any shortcomings or concerns present.
***
DIY leashes can be super fun to make and they give you the chance to custom-make a leash that is specifically suited for your pooch. Just remember to execute these DIY plans with care and your dog is sure to enjoy strutting his new digs around town.
Now that you have a great DIY dog leash, be sure to check out some our other great DIY projects!
Have you ever created a DIY leash for your doggo? What did you do to capture his unique sense of style? We’d love to hear all about it in the comments below.




No Comments